
CDK Integration Testing

Integration tests are challenging in a standard application. They’re even more challenging in a decoupled, asynchronous environment. If you’re running them in a pipeline, you have to figure out all of the resource ARNs and make sure you have permission to access each of them. Also, what happens if your integration tests fail? Do you send a notification so someone can manually redeploy the previous version?
Running integration tests in a CloudFormation custom resource simplifies a few of these issues. You can use references to other resources in the stack to get the required ARNs. You can use those same references to build execution rules for the integration test. Finally, if the integration tests fail, then CloudFormation will automatically roll back the deployment.
An example project can be found in the GitHub project theBenForce/cdk-integration-tests
How does it work?
The idea came from the article Testing the Async Cloud with AWS CDK. Essentially it comes down to leveraging two features of CloudFormation: CustomResources and automatic rollbacks. Instead of creating an actual resource with your custom resource handler, you’re going to execute your integration tests.
CloudFormation Custom Resources
A custom resource is an escape hatch in CloudFormation that allows you to manage external resources from your IaC template. The custom resource accepts the ARN of a lambda to be called, and any properties that you want to pass in.
At deployment time, CloudFormation calls your lambda with all of the parameters supplied in the template and a few additional properties supplied by CloudFormation. The extra properties include the action to take (create, update, or delete) and a presigned S3 URL.
When your function has finished execution, it needs to upload its result to the presigned URL that CloudFormation passed in. In addition to the final status, your lambda can add any output parameters that you want to reference within your CloudFormation template.
UVU Test Runner
The UVU test runner is a good library for running your integration tests in a lambda. It’s lightweight and simple to use. It doesn’t currently provide a programmatic interface for running tests, but that is being actively developed.
ℹ️ Since all you need from the test runner is to know if the tests passed or failed, you won’t need anything that advanced. The zora testing library looks like a good alternative if you want to try something different.
Building a CDK construct
Now that you know how the tests will work, you’ll create a CDK construct that you can reuse throughout your project. Even if you aren’t using the CDK, the process should be pretty easy to replicate in CloudFormation or Terraform.
Custom Resource Lambda Handler
Start by creating a new folder for your construct, call it IntegrationTests. You’re going to create the actual construct inside an index file later. Before you start working on that you’ll create the handler lambda.
Install the cfn-lambda package in your project. It provides some helper methods to make creating the custom resource handler easier. Once it’s installed, create a file called handlerLambda.ts inside of the IntegrationTests directory. Add the following code to the file to handle basic custom resource interactions.
import CfnLambda from "cfn-lambda";

export const handler = CfnLambda({
	async AsyncCreate(properties) {
		return {
      FnGetAttrsDataObj: {
        TestPassed: true,
        Finished: new Date().toISOString(),
      },
    };
	},
	async AsyncUpdate(physicalId, properties) {
		return {
      FnGetAttrsDataObj: {
        TestPassed: true,
        Finished: new Date().toISOString(),
      },
    };
	},
	async AsyncDelete(physicalId, properties) {
		return {};
	}
});
Next, you need to create a method called runTests that runs the test file that is passed into the construct. You’ll add the test code to the lambda by doing a lazy import of an environment variable. You’ll provide the value of the environment variable at build time, which esbuild will be able to see when it’s bundling the lambda’s source.
import {exec, suite} from 'uvu';

...

const runTests = async (properties: unknown) => {
    const {default: initTests} = await import(process.env.TEST_FILE!);
};
The initTests method will need to accept a uvu test suite as its only parameter. You’ll pass the custom resource’s properties into the test suite’s context so they can be accessed during runtime. You’ll also need to call the test suite’s run method to make sure it’s added to the list of tests to be executed.
const runTests = async (properties: unknown) => {
    const {default: initTests} = await import(process.env.TEST_FILE!);

    const test = suite('Integration Test', properties);
    initTests(test);
    test.run();
};
Now you need to tell uvu to run all of the tests, then check the result. Unfortunately, uvu doesn’t fully support the programmatic execution of tests, so you need to use a workaround to get the test results. Check to see if process.exitCode was set to 1, which means at least one of the tests failed. If you throw an exception, cfn-lambda will pick it up and mark your custom resource’s deployment as a failure.
const runTests = async (properties: unknown) => {
		...

    const result = await exec();

    if (process.exitCode) {
      throw new Error(`Tests Failed`);
    }
};
Now that you have the runTest method, you need to call it from the create and update handlers. You can optionally return an object with FnGetAttrsDataObj set if you want to reference some values in your CloudFormation template.
async AsyncCreate(properties) {
  await runTests(properties);

  return {
    FnGetAttrsDataObj: {
      TestPassed: true,
      Finished: new Date().toISOString(),
    },
  };
},
async AsyncUpdate(physicalId, properties) {
  await runTests(properties);
  return {
    FnGetAttrsDataObj: {
      TestPassed: true,
      Finished: new Date().toISOString(),
    },
  };
},
That’s all there is to the lambda. Really it’s just a uvu test runner. Now you need to create the construct that deploys it and any tests that need to be executed.
Creating the Resource
Create an index.ts file in the IntegrationTests directory. Add the following code to get started.
import * as cdk from "@aws-cdk/core";
import * as nodeLambda from "@aws-cdk/aws-lambda-nodejs";
import * as lambda from '@aws-cdk/aws-lambda';

interface IntegrationTestsProps {
  testEntry: string;
  timeout: cdk.Duration;

  /** These values will be passed into the context of your tests */
  properties?: Record<string, string>;
}

export class IntegrationTests extends cdk.Construct {
	private handler: lambda.IFunction;

	constructor(scope: cdk.Construct, id: string, props: IntegrationTestsProps) {
		super(scope, id);
	}
}
You can see there are three properties that your construct will accept. The testEntry property accepts a path to the file that will be injected into the lambda handler that you created in the previous step. timeout specifies the maximum amount of time that your lambda can spend running the integration tests. Finally, properties allows you to pass values into the custom resource that will be available when the tests execute.
Next, create the handler lambda. The only complicated part of this is injecting the testEntry property into your source code. You’re going to use esbuild to take care of that.
The NodejsFunction construct uses esbuild to bundle lambda sources. It allows you to customize the build process using the bundling property.
The bundling parameter that you’re going to use is define, which tells esbuild to replace global values with a constant. This replacement will happen before bundling, so when esbuild sees your import statement it will bundle the source code found at the provided path.
this.handler = new nodeLambda.NodejsFunction(this, 'TestRunner', {
	entry: require.resolve('./handlerLambda.ts'),
	timeout: props.timeout,
	runtime: lambda.Runtime.NODEJS_14_X,
	bundling: {
		define: {
      "process.env.TEST_FILE": `"${props.testEntry}"`,
    },
	}
});
Now that the lambda is created, you can create a custom resource. Pass the lambda’s ARN into the serviceToken parameter. Also, provide a property that will change each deployment to ensure the test will be executed every time.
new cdk.CustomResource(this, 'IntegrationTests', {
	serviceToken: this.handler.functionArn,
	properties: {
		...props.properties,
		Version: new Date().toISOString(),
	}
});
Granting Permissions
Your construct is all set up to execute any test that you pass into it. More than likely most of those tests will require access to an AWS resource. To make the process of granting permissions to your lambda simpler, change your IntegrationTests construct to implement the iam.IGrantable interface.
export class IntegrationTests extends cdk.Construct implements iam.IGrantable {The IGrantable interface only has one property: grantPrincipal. This property is used with the grant* methods of CDK constructs. For example, your handler function has the grantInvoke method that will give a principal permission to invoke it.
Since the handler lambda requires any permissions granted to your integration tests, simply return its grantPrincipal property.
get grantPrincipal(): iam.IPrincipal {
  return this.handler.grantPrincipal;
}
Running some tests
Now that you’ve finished building the construct, it’s time to test it out. Create an empty stack and add an instance of the IntegrationTests construct to it.
import * as cdk from '@aws-cdk/core';

import { IntegrationTests } from '../constructs/integrationTests';

export class TestStack extends cdk.Stack {
  constructor(scope: cdk.Construct, id: string, props: cdk.StackProps = {}) {
    super(scope, id, props);

    new IntegrationTests(this, `IntegrationTests`, {
      testEntry: require.resolve("./tests.ts"),
      timeout: cdk.Duration.seconds(5),
      properties: {
        Foo: "Bar"
      }
    });
  }
}
Creating some tests
The testEntry property that you passed into the IntegrationTests construct points to a file called tests.ts in the same directory as TestStack. Create that file and add the following code to it.
import {Test} from 'uvu';
import * as assert from 'uvu/assert';

interface TestContext {
    Foo: string;
}

export default (test: Test<TestContext>) => {
    test('First test', async (context) => {
        assert.equal(context.Foo, 'Bar', 'Foo should be Bar');
    });
};
This code adds a single test that makes sure the Foo property passed into IntegrationTests is equal to Bar.
Testing it
Everything is set up now, you can run npx cdk deploy from your project’s root directory and it should deploy successfully.
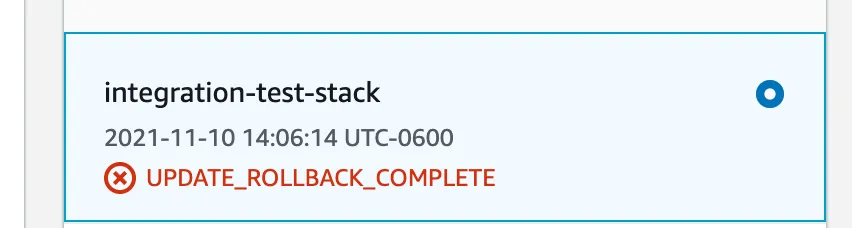
To validate that your tests will actually roll back the stack when they fail, change the Foo property that you passed into IntegrationTests from Bar to Fighters. Now deploy your stack again. This time it should fail, and if you open up the CloudFormation console you’ll see a status of UPDATE_ROLLBACK_COMPLETE.
Summary
In this tutorial you’ve seen how to create a lambda-backed custom resource, how to inject code into a lambda using esbuild, and how to roll back deployments by throwing an error inside a custom resource handler.